Creating Document Change Control Form
In this section, we will demonstrate how you can build a HTML form, which loads fields from external, already created/ available form and also how system can fetch and display documents from other form for view/ edit. This example is useful learning on how from Document Change Control form, we can fetch data & documents from already available form (qc_documents) and view and edit that data. You can use this example to also control other modules e.g you can link Device Details and Calibration forms, and view/ edit device details document & control device status.
To create a new Document Change Control form, goto your Change Request Document's view page and click Database icon () at the end. This will open a new HTML form creation page.
Click on Available Forms. Then Click to download () Change Control form. Save the existing form As it is with a password. If prompted, select Change Control Number as default field. This will save the form and you will be redirected to index page. Notice that the form builder automatically loads a copy of change request document inside ONLYOFFICE Document Editor, which you can edit, add your notes for users to read while they add data to this form, once the form is ready.
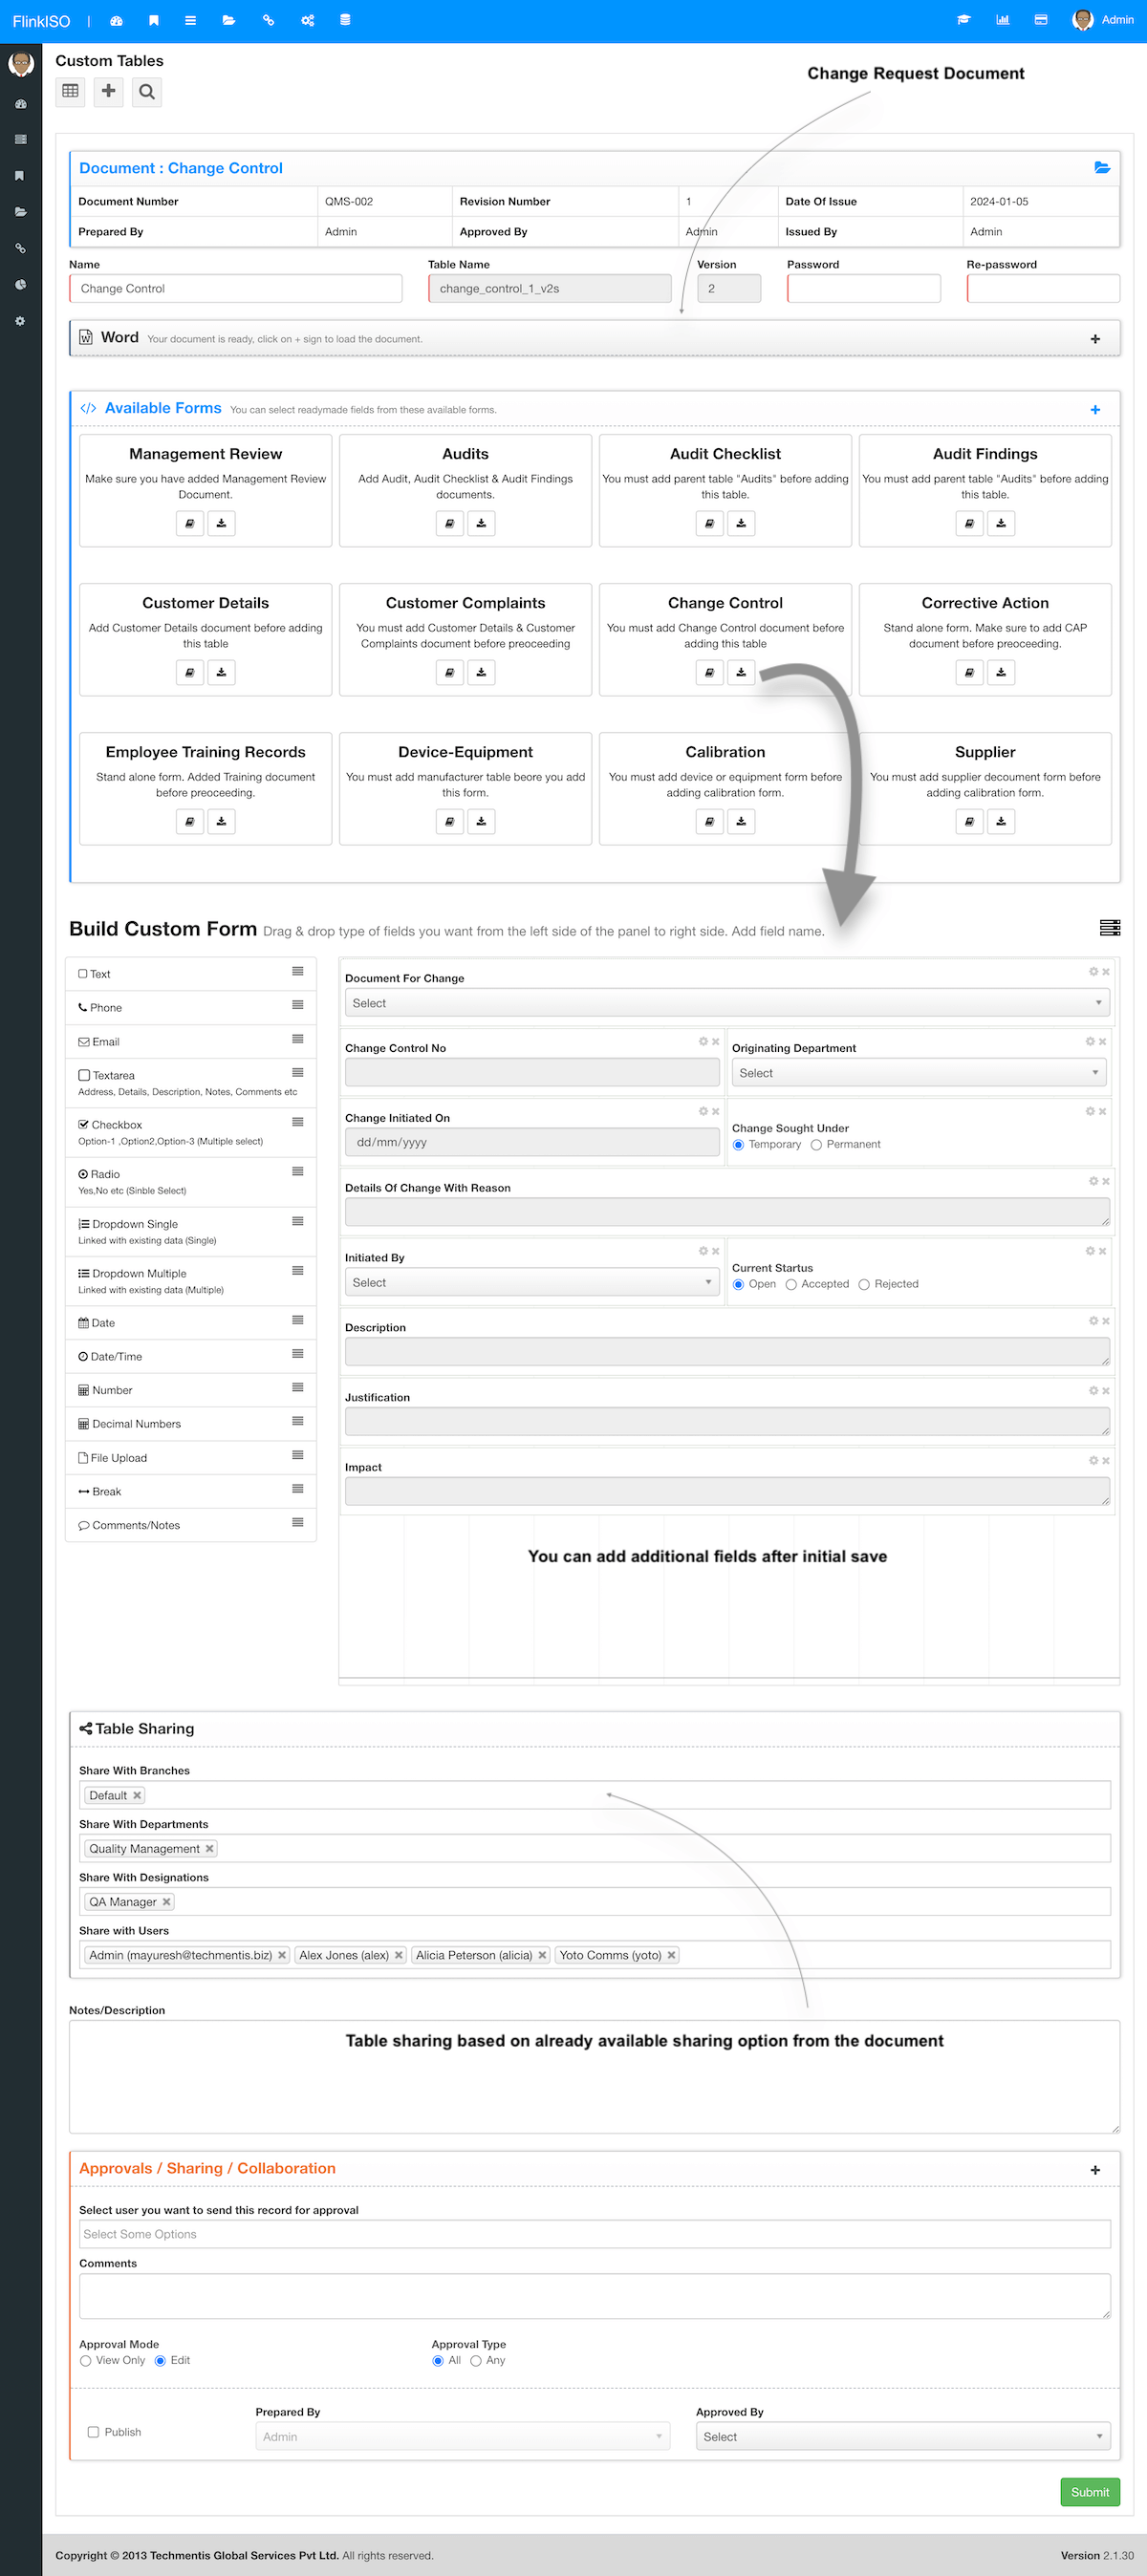
If you click on + sing of a newly created form's index page, you should be able to view a newly created Change Request form. Do not add any data to this form as of yet. Go back to custom table's index page and click on cog icon to edit and recreate the HTML table.
Submit the form again without making any changes. This will load the belogsTos table list below the elements.
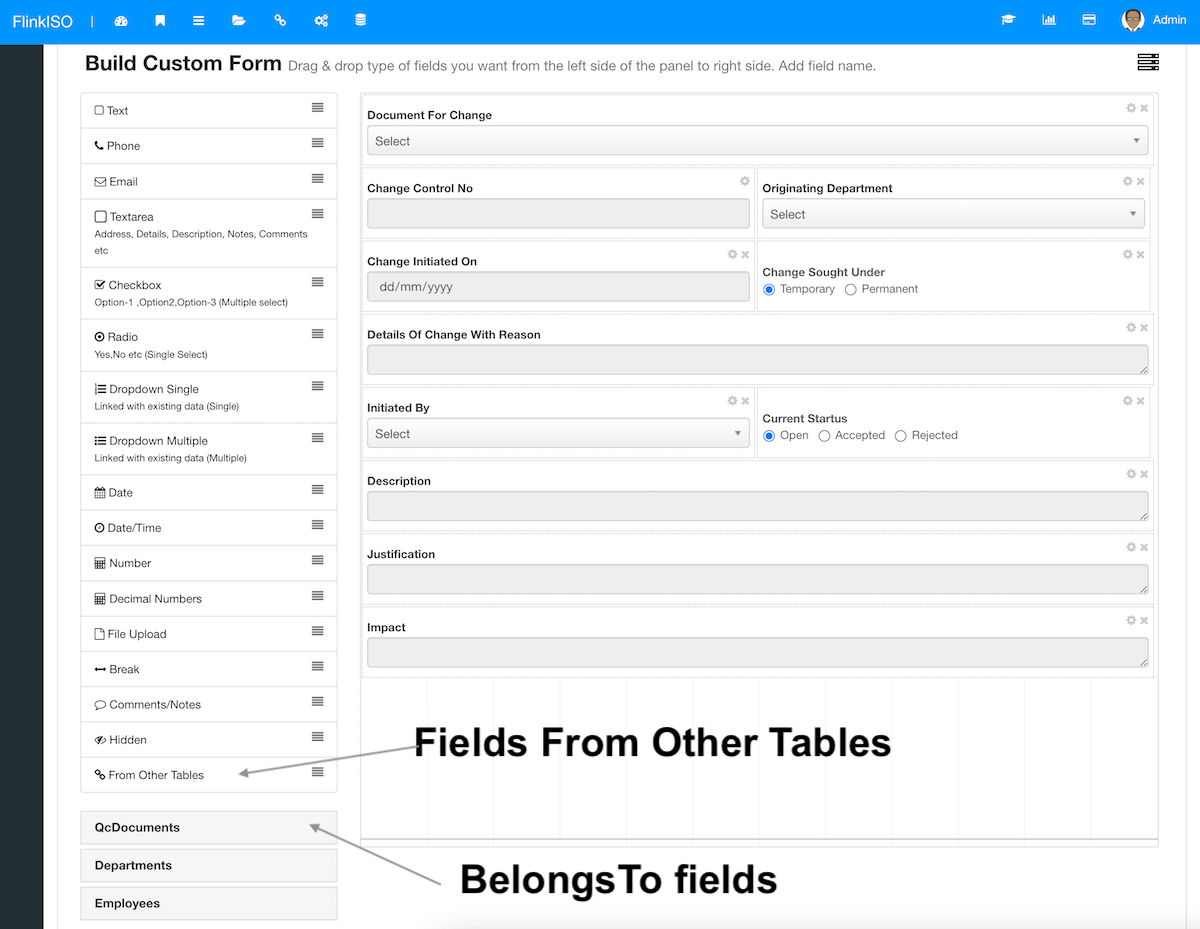
Once you see the QcDocument in the list, click on it and manually copy "document_status" field. Then drag and drop "From Other Tables" field onto the HTML form Builder. Click on gear icon () to open the field setting window. From Select Linked Model, select DocumentForChange (this is your existing field we have already added which is linked with the QcDocument table) and then paste "document_status" in "Add Model Field Name" field. Click on Update.
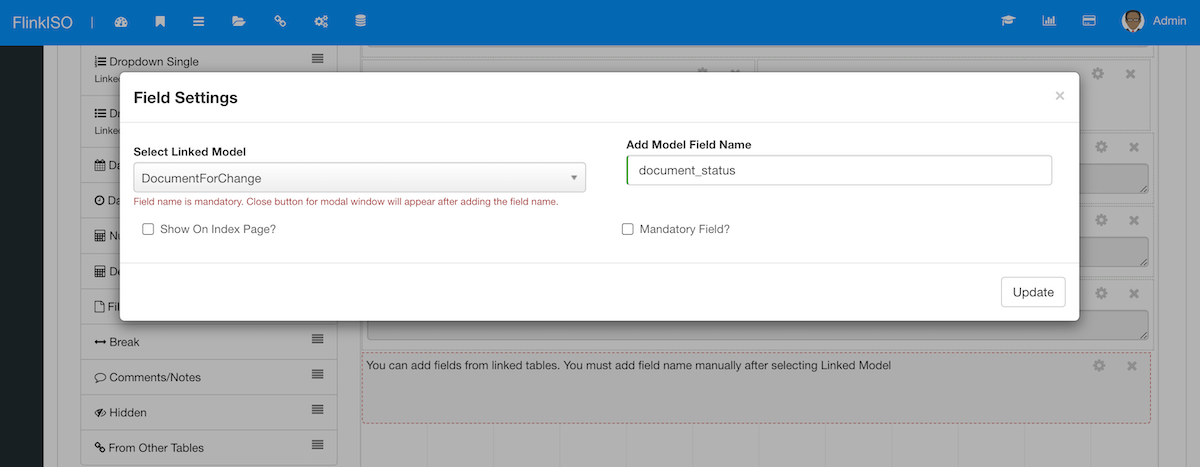
Save the form to refresh table. This will show document_status field from QcDocuments table, to this newly created table. From this field you can control the status of the document while creating and editing the Change Request.
In order to load the document for which we will be adding the change requests, click on "Document For Change" field's gear icon to open the Field Setting. From Document Options,
- Select Yes for Load Document
- Document Mode as Edit, so that users can collaborate and edit the document
- And Copy for "Load Original Document or Copy?" so that no changes will be written onto the original document
Also make sure to check "Disable on Edit Form?" as YES, so that once the record is created, users can not change the document from the edit page. Click on update and submit.
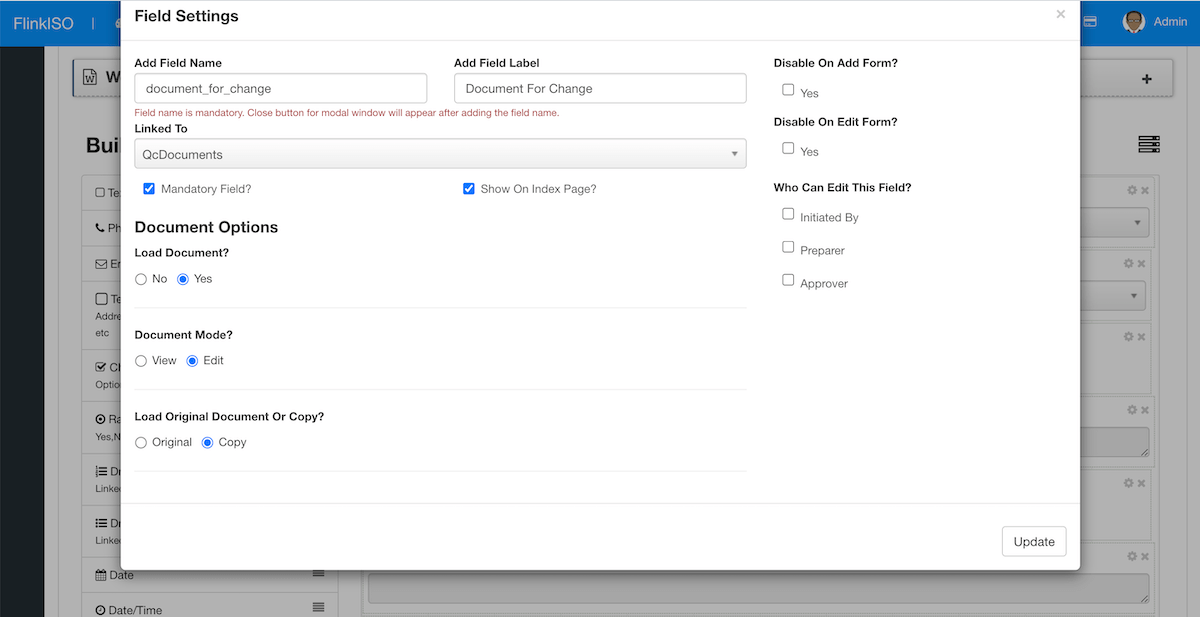
Apart from these setting your can also add additional settings like Who Can Edit This Field, "Unique Field?" for Change Control Number etc for each field depending on your requirements. You can also edit additional fields and add tasks, email alerts etc., change the size and position of each field.
Defining newly created table
It is important to let the system know that you have created this Change Request Table, so that this can be linked with the QMS Documents table. To do that, goto to Settings Menu and then "Define Change History Table" link and follow the instructions on the page. Once you select this newly created table from the drop down, select the fields you would like to show on QcDocument's view section's Change Request Tab.
Available Modules
These readily available forms are created within the system without any coding. Similar to these forms, you can create your own forms & modules on-the-fly without any help from experts and with zero-coding.
Audit Management
Add Audit Schedules, Audit Checklists, Audit Findings, Assign findings to users with target dates.
Audit Management
Change Control
Have complete control on your documents & processes. Lock documents which are under review.
Change Control
Management Review
Schedule management review meetings, send email alerts to invitees, assign agendas and more.
Management Review
Customer Complaints
Record every Customer Complaint and assign them with target dates to users, send email alerts.
Customer Complaints
Corrective Actions
Create and track Corrective Actions performed. Use drag and drop to create the Custom Forms.
Corrective Actions
Employee Training
Add training details of employees or departments. Keep track of all the Trainings and Evaluations.
Employee Training
Device-Equipment
Use ready forms and add Devices/ Equipment list along with Manufacturer and Supplier Details.
Device-Equipment
Calibrations
Add Devices/ Equipment to the system. Define your Calibration Method and add Calibration Details as per defined.
Calibration
You can customize all these existing modules & forms without any coding. You can add/ remove fields, change field locations, resize them, hide/ show fields on index page, restrict users from editing fields etc. You can also add your own business rules, email notifications, custom alerts & tasks and much more.
More Features
ONLYOFFICE Doc Editors
With ONLYOFFICE™ Editors, you have complete control on your documents without loosing any formatting unlike online web-based HTML editors.
Document Version Control
Each and Every QMS document created/ uploaded in the QMS is Version Controlled and Access Controlled and follows all the Document Management best practices.
Security
Add password to secure your PDFs while you download them. System records every downloads with issue number & timestamps along with user details.
Validation
HTML forms created are automatically version controlled, ready with required validations as well as design/ layout you choose while creating these HTML forms.
Access Control
Each of these forms are either linked with the QMS document and by default inherit access restrictions based on document access.
Approvals
Every form created, by default follows system's approval system. Users with limited roles, cannot publish any record in the system unless that record/ document is approved by HoDs or Administrators.
Lossless Migration
With ONLYOFFICE™ Editors, you can preserve all your formulas and sheets in your spreadsheets.
Upload / Create
Simply upload the existing documents/ spreadsheets/ presentations to create the document or spreadsheet.
Scheduled Data Entry
You can easily create spreadsheets, documents, formats etc and share with users within the system for scheduled data entry, eliminating efforts of printing and distributing these documents manually.
Centralized Data
Users can open these shared documents from within the system, add their data and save them onto the system without any need to download/ upload. All data is stored in a singled location and can be accessed secuerly.
Drag and Drop
To store this data in SQL format instead of Document format, you are free to build HTML forms within the system by using our Drag-and-Drop feature.
Digital Signature
Digitally sign all your QMS document while downloading them in PDF format. You can draw your signature or upload existing signature to the system.