Control how each field is stored, displayed, completed and edited in generated forms.
Select the settings icon on a field in the form canvas to open Field Settings. Every field has identity and display controls. Additional options appear when the selected field supports choices, linked records, dates, files, documents, tabs or workflow restrictions.
Name and label
Setting
How it works
Field Name
The database-safe name used to store the value and identify it in templates, reports, triggers and integrations. Use a short lowercase name with underscores, such as target_completion_date.
Field Label
The readable name shown to users on Add, Edit and View pages. The label can contain spaces and normal title text.
Default Field
Identifies the main value used to represent a record in lists and links. A form must have one default field.
Treat the field name as a permanent identifier. Changing it after records, PDF templates, triggers or reports use it can break those connections. Review the saved definition and take the normal database backup before a structural production change.
Layout and list display
Setting
How it works
Display Size
Sets the field width in the responsive form grid. Related short fields can share a row; full-width narrative or file fields normally use the complete row.
Sequence
Controls the field order in the generated form. Dragging fields in the canvas also changes their sequence.
Show on Index Page
Adds the field as a column on the module index. Select only values that help users identify, filter or compare records so the table remains usable on smaller screens.
Tab Name, Group and Sequence
Places the field in a named tab and controls the position of that tab group. Fields with the same tab name appear together; fields without a tab stay in the normal form flow.
Comments / Notes
Displays explanatory text in the form without collecting a stored response.
Data entry and defaults
Setting
How it works
Mandatory Field
Requires a value before the record can be saved. In a Child Form, an entirely empty row is ignored; once a row is started, its mandatory fields are validated.
Disable on Add Form
Shows the field as unavailable while a record is created. Use this for values that should be completed later in the workflow.
Disable on Edit Form
Prevents normal changes after the record has been created.
Default Value or Placeholder
Provides an initial value or prompt where the field type supports it. Text fields can use the last saved value as a placeholder.
Date Default
For date fields, calculates a default from Today or another date field using a configured number of days, weeks, months or years.
Session Value
Populates a linked Employee, User, Branch, Department or Designation field from the signed-in user’s session when a new record is created.
Edit and workflow controls
Field controls work with the module’s table permissions and approval process. A user must first have access to the record; these settings then determine whether that person can change this particular field.
Setting
How it works
Who Can Edit This Field?
Limits editing to the Creator, Preparer, Approver, a user referenced by another configured record field, or employees with one of the selected designations. These choices use an OR rule: a user may edit the field when any selected role, record relationship or designation matches. If no editor or designation is selected, the field follows normal module permissions.
Approval Step Rules
Sets the field to editable, read-only or hidden at selected approval steps. Use it when different parts of a record are completed by different participants.
Lock for Sender
During approval, protects the field from other users and allows the assigned approval user to complete the controlled value.
Field-level access is additional to normal record access. The user must be able to open and edit the record before a selected role or designation can grant access to an individual field.
Disabled and protected fields are also enforced when data is submitted. A changed browser or API value does not override the value already stored for a field the current user cannot edit. The same protection applies to main forms and Child Forms.
Settings by field type
Field type
Additional settings
Radio, checkbox and choice fields
Enter the permitted options. Radio and single dropdown fields store one selection; checkbox and multiple dropdown fields allow several selections.
Linked dropdowns
Select the linked model or table and the field used to display each related record. The saved value keeps the relationship between the two records.
From Other Tables
Select a linked model and specify the model field name to show a value from the related record.
File Upload
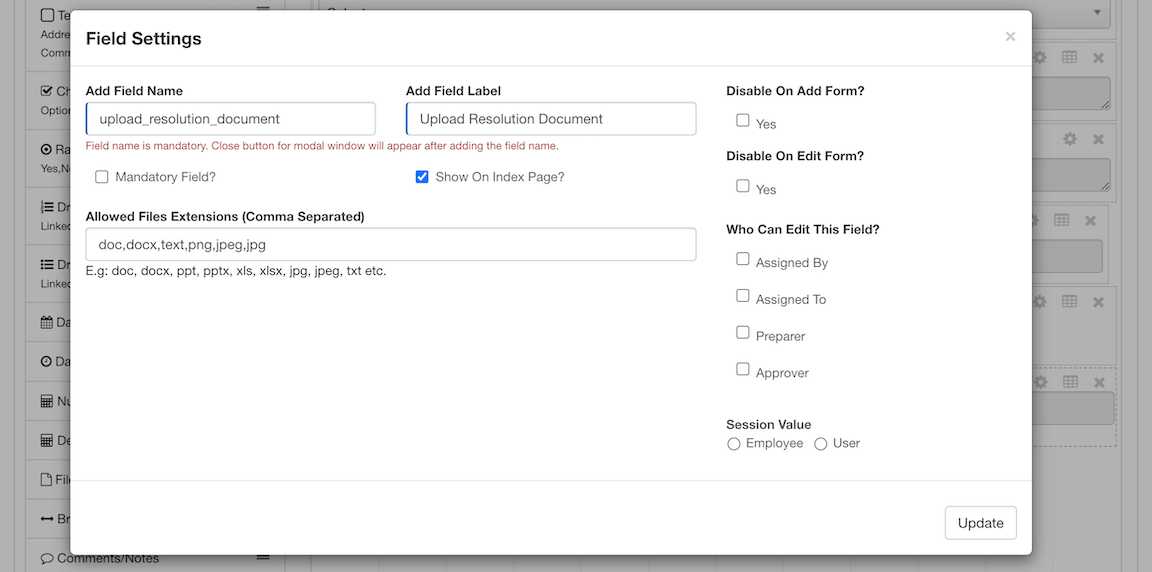
Enter allowed extensions as a comma-separated list. Only the configured file types are accepted.
Document field
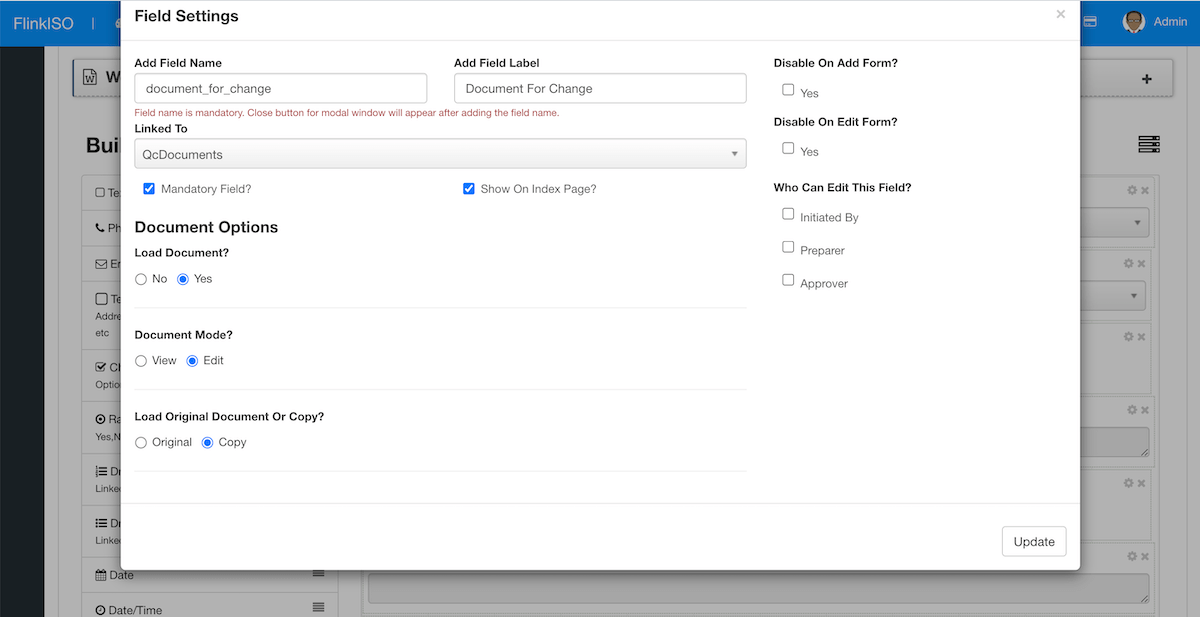
Select the linked document, whether the document loads in View or Edit mode, and whether the original document or a working copy is opened.
Child Forms
Select one or more repeatable child forms to place at that point in the main form sequence.
A File Upload field combines common display and access controls with its allowed file extensions.
Document field options
A document field links the generated record to a controlled document. Document Mode determines whether the embedded editor opens for viewing or editing. Load Original Document or Copy determines whether users work with the controlled source or a separate working copy. Use the copy option when form records should not alter the original controlled document.
Document-specific options appear together with the common field controls.
Save and verify the result
Select Update to save the field settings, then save the complete form definition.
Generate or rebuild the module so its Add, Edit and View pages use the saved definition.
Test with users who represent each configured editor, approval role or designation, including one user who should not be allowed to edit the field.
Check required fields, defaults, linked values, index columns, tabs and mobile layout before using the form for live records.
FlinkISO user manual
Continue through the guide
Follow the setup sequence or jump directly to the part of the application you are working with.